Hello Friends,
In this post, I have tried to keep the process of installation of Oracle SOA 12c as simple as possible. Kindly, go through the process and let me know in case any suggestion or you need any further help.
STEP 0:
Before proceeding with the installation, let see the prerequisites by going to the below URL:-
NOTE:- The prerequisites will get varies based on the version of Oracle SOA you install. Here, I have shown the installation process of Oracle SOA 12c version 12.2.1.0.0
Follow below steps to install Oracle SOA 12c.
Step 1:
Click here to download the Oracle SOA 12c installer from the Oracle site.
Once you are on the above mentioned Oracle site, select the Accept License Agreements.

Next:
Click on the below link to download the part 1 and 2 of version 12.2.1.0.0
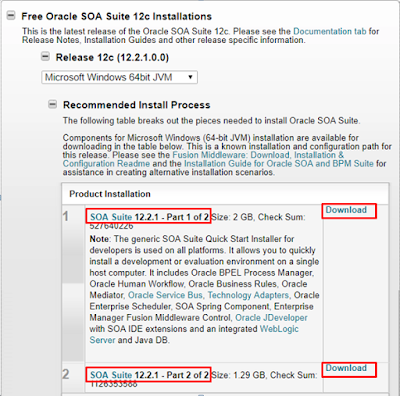
Once the download finish, you will see below 2 zip files in your folder-
· fmw_12.2.1.0.0_soaqs_Disk1_1of2.zip
· fmw_12.2.1.0.0_soaqs_Disk1_2of2.zip
Unzip the files and you will see 2 folders and inside which you will see mentioned jar files:-
fmw_12.2.1.0.0_soaqs_Disk1_1of2-->fmw_12.2.1.0.0_soa_quickstart.jar
fmw_12.2.1.0.0_soaqs_Disk1_2of2-->fmw_12.2.1.0.0_soa_quickstart2.jar
NOTE:- Keep these executable jar files in the same folder, and also the folder does not have any space in names, otherwise you will face InstallerMissingIssue.
I have given the name as “C:\Oracle\OraclejDev12c-05May2018”.
Step 2:
This step is about the supported JDK installation, you will not be able to run Oracle SOA 12c installer if you don’t have supported JDK.
You can download the latest JDK from JDK Link.
Step 3:
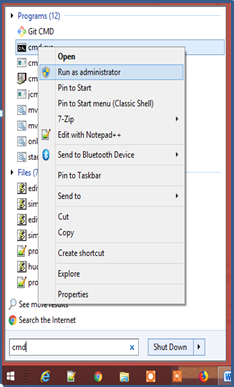
Open the cmd prompt, right-click on it and run it as administrator, It's important to run cmd prompt as administrator otherwise you will face AdministratorIssue.
Got to StartMenu-->type cmd-->go to cmd.exe-->right click and run as administrator
Step 4:
Go to java bin folder where your JDK is installed.
In my case: “C:\Program Files\Java\jdk1.8.0_171\bin”
As Oracle SOA 12c is an executable jar file so we need to run it from the cmd prompt
Run below command in command prompt.
Java –jar Oracle_SOA_12c_firstexceutable_Jar_FileLocation
Java –jar C:\Oracle\OraclejDev12c-05May2018\CommonjarFiles\fmw_12.2.1.0.0_soa_quickstart.jar

Here, you see the files are getting Extracted. It will launch the installer. Once all the files are extracted.

Step 5:
Here, you will see the welcome screen, click next on the screen.

Step 6:
On the Auto Updated screen, keep the default “Skip Auto Updated” option as-is and click on Next.

Step 7:
Below you see the Installation location screen, where you need to set the Oracle Home to your desired location. After selection click Next.

Step 8:
On the Next prerequisite checks screen, it will check the entire prerequisite. In my case the jdk is having old version and because of this I have got warning as
- Checking Java version used to launch the installer
- Problem: This JDK version was not certified at the time it was made generally available. It may have been certified following general availability. Recommendation: Check the Supported System Configurations Guide (http://www.oracle.com/technetwork/middleware/ias/downloads/fusion-certification-100350.html) for further details. Press "Next" if you wish to continue. Expected result: 1.8.0_51 Actual result: 1.8.0_171
Click Next.

Step 9:
Here, In the Installation summary, you can review the installation summary and also can save the response file if you want to. Next click Install to start the main installation.

Step 10:
You can see the Installation is started:-

You can see the Installation is in progress:

Step 11:
Once you see the setup is 100% complete, click on Next.

Step 12:
Here you see the installation summary with the message saying “Oracle Fusion Middleware 12c SOA Quick Start installation completed successfully”, also with an option to select “Start JDeveloper” checkbox, select this option if you want to start the Jdeveloper and then click on Finish.
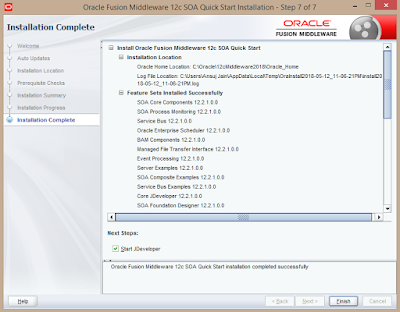
You are done with the Oracle SOA 12c installation.
Hope, this might help you. Please let me know in case you need further details.
Good Luck!!
Thanks for sharing this great information I am impressed by the information that you have on this blog. Same as your blog i found another one Oracle SOA . Actually I was looking for the same information on internet for Oracle SOA and came across your blog. I am impressed by the information that you have on this blog. It shows how well you understand this subject, you can learn more aboutOracle SOA . By attending Oracle SOA Training .
ReplyDelete